Overview:
Use Customers in Data Migration to import customer records from a CSV or Excel file into N3 AI POS. The template lets you prepare customer codes, names, registration details, contact information and customer categories together. Check the file and its preview carefully so each record is ready for use in customer maintenance and sales.
At the end of this article, you will be able to:
• Open Customers Data Migration and download the template
• Use the Customer and Information worksheets
• Identify required and optional fields
• Prepare, upload and verify customer records
• Import the reviewed data and check the customer list
View Customers Data Migration
1. Check the company shown at the top of the portal. Make sure it is the company you intend to maintain.
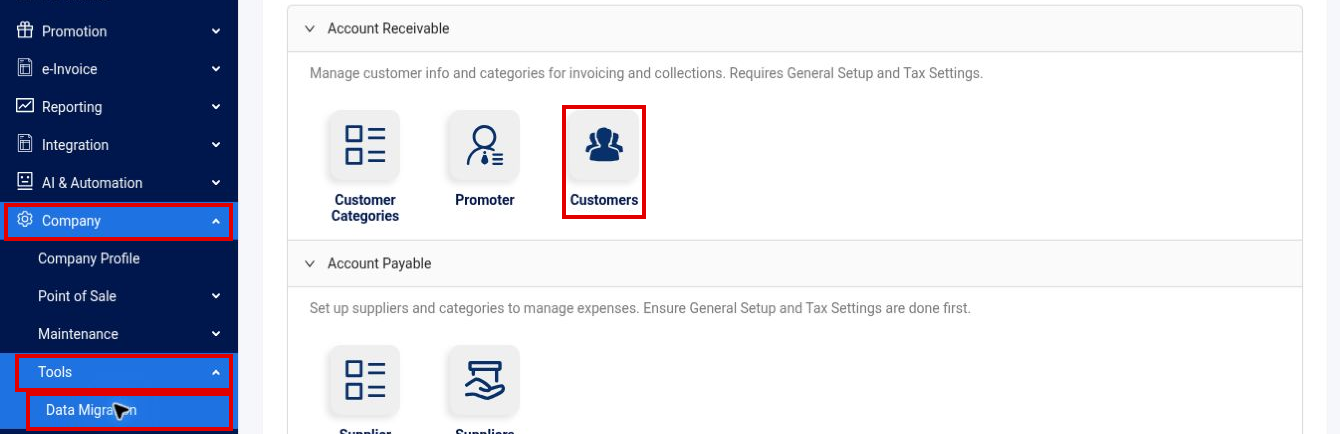
2. Expand Company > Tools in the left navigation panel, then click Data Migration.
3. Under Account Receivable, click the Customers icon.
Tip – Choose Customers to import customer records. Customer Categories is a separate migration option for category records.
Before you begin
Complete General Setup and Tax Settings, as indicated on the migration page. If you plan to assign customer categories, prepare the relevant categories first and check that they are available for selection.
Understand the Customers Import Template
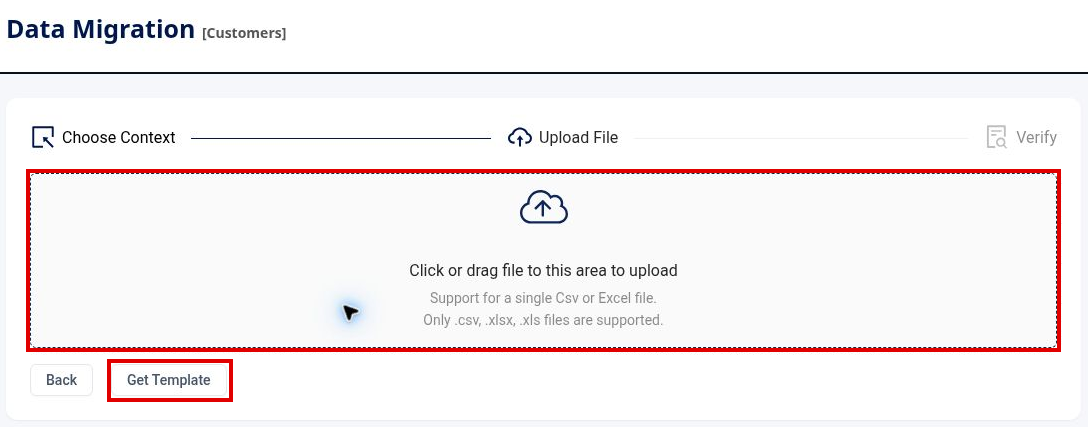
On the Upload File screen, click Get Template. The downloaded Excel workbook contains two worksheets: Customer and Information. The images below come directly from that workbook.
1. First worksheet – Customer
Row 1 contains the import fields. Enter your values in the blank rows below it, with one customer per row. Keep the headings unchanged. This wide sheet is shown in two parts.
Customer worksheet – columns A to D

Customer worksheet – columns E to H

2. Second worksheet – Information
Read this sheet before entering data. It provides brief instructions, followed by each field’s description, data type, required status and maximum length.

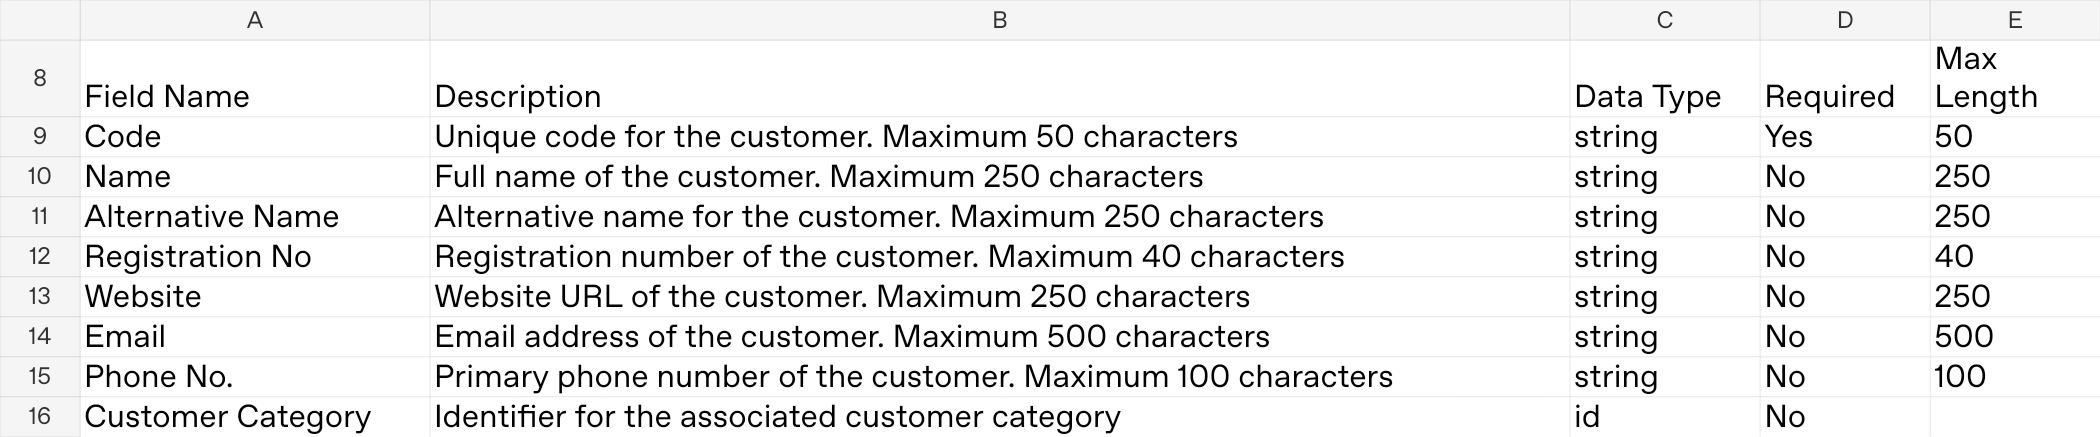
Note – Code is the only field marked Required = Yes. The other seven fields are optional and may be left blank. Enter the available customer details accurately, and please review them before importing.
Prepare and Upload Customers
1. Complete the Customer worksheet. Fields marked * are required. Use one unique customer code for each customer.
*Code – Customer code, up to 50 characters. Check for duplicates in your file and existing customer records before proceeding.
Name / Alternative Name – Customer name and alternative name, up to 250 characters each. A clear Name helps staff identify the customer.
Registration No – Customer registration number, up to 40 characters.
Website / Email – Customer website URL (up to 250 characters) and email address (up to 500 characters). Check the actual values for accuracy.
Phone No. – Primary phone number, up to 100 characters. Preserve leading zeros and any intended country prefix.
Customer Category – Optional reference to a customer category. Confirm the intended category in the preview lookup. You may leave it blank when no category is needed.
2. Review the file. Keep codes, registration numbers and phone numbers as Text in Excel where needed to preserve their original format. Check the field lengths against Information.
3. Save the completed file. The portal accepts one .csv, .xlsx or .xls file at a time. Click the upload area to select your file, or drag the file into that area.
Note – The template marks optional fields as not required. Do not assume that importing a matching customer code updates the existing record or preserves its current values.
Verify and Import Customers
1. At Verify, compare the Preview record count with your prepared rows. Check Code and Name on every row. Review the remaining fields using the horizontal scrollbar.
Tip – The screenshot uses two fictional customers with optional fields left blank. Replace these examples with your own reviewed customer data.
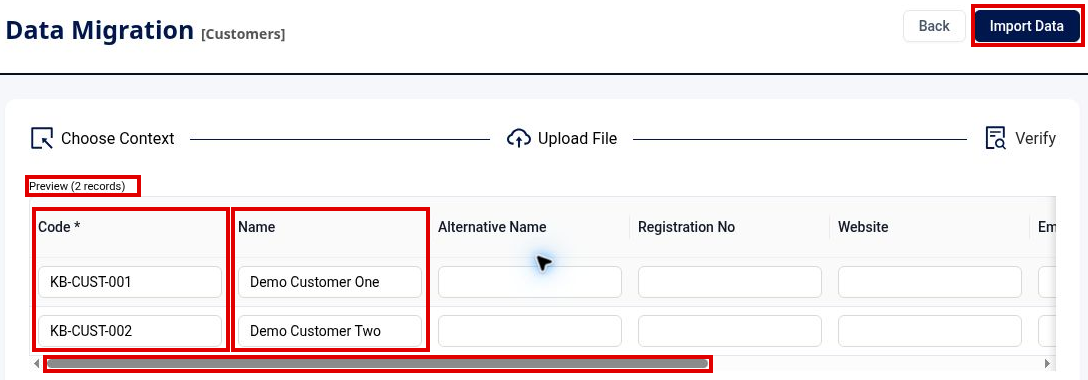
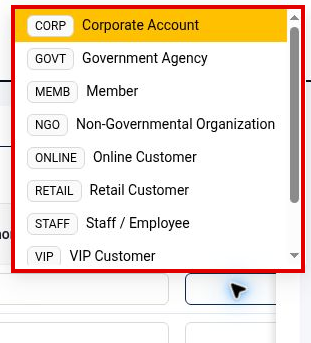
2. If you need a Customer Category, scroll right and open its lookup. Choose the correct existing category. Leave it blank when no category is required.
Note – Review registration and contact details carefully. You can edit values in the preview. To replace the file, click Back, select Customers again and upload the corrected file.
3. Once all rows are correct, click Import Data. Read the result shown by the portal. If issues are reported, correct the affected records before retrying.
What’s Next
1. Open Customers in the left navigation panel. Find the imported customer codes and review their names, contact information and category assignments.
2. Confirm the records you intended to import are present and accurate before staff use them for daily work.
** Learn more about Azure Cloud
** Learn more about QNE Hybrid Cloud Software
Was this article helpful?
That’s Great!
Thank you for your feedback
Sorry! We couldn't be helpful
Thank you for your feedback
Feedback sent
We appreciate your effort and will try to fix the article
