Step 1
You will first need to connect to your database server, using SQL Server Management Studio Express..
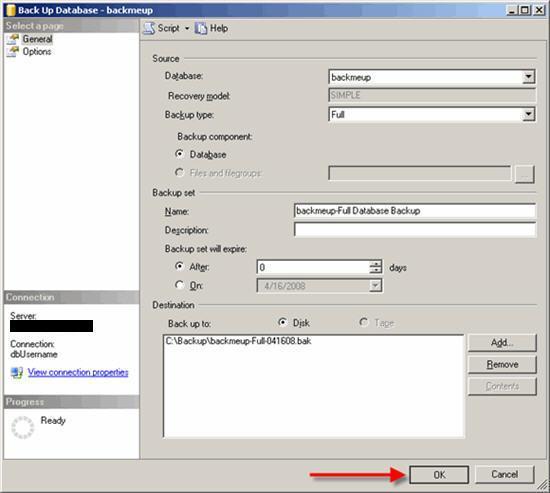
For this example, we will backup the database named “backmeup” to our “C:\backup” folder.
Once connected to your database server, you will need to browse to your database in the left window pane of Management Studio.
Right Click on your database, and under “Tasks” choose “Back Up…”

Step 2
A new window will open where we will configure where to save the database backup file.
You will want to ensure that the “Backup type” is set to “Full” to get a Full backup of your database.
Now, highlight the Destination file that is already in the list by clicking on it, and Click “Remove“.

Step 3
Now, Click “Add…” to specify where to save the backup file.

Step 4
A window will pop up, asking you where to save the backup file. Enter a location of your choice.
For this example, we will save it to “C:\Backup\backmeup-Full-041608.bak“.
Note that this is the entire actual filepath.
Step 5
Now, we have to make sure that the backup you are creating overwrites all existing backup sets, as appending it to an existing set can cause conflicts when attempting to perform a restore. On the left-hand side of the window, click on ‘Options‘, and then click on ‘Overwrite all existing backup sets‘.

Step 6
Once this option is in place, all that is left to do is to run the backup! Click “OK” to begin the database backup.

Step 7
If the database backed up successfully, you should receive a message as pictured below.

Was this article helpful?
That’s Great!
Thank you for your feedback
Sorry! We couldn't be helpful
Thank you for your feedback
Feedback sent
We appreciate your effort and will try to fix the article
