 Youtube Video Tutorial - Right Click - Open Link In A New Tab (Installation of QNE Optimum in Network Environment)
1. Obtain the Installer CD and insert in your CD ROM drive. If you have the installer in flash drive, just plug it to any available USB port of your PC. Open the Windows Explorer and locate the Setup_Full.exe. Right click on it and select Run as Administrator

2. In the "Select Setup Language" screen, click OK to continue.

3. Click Next when the Setup Welcome screen appears.

4. On the following screen, tick the option 'I accept the agreement' and click Next to proceed

5. Select Client Installation and click Next

6. Installation will start. Wait until the installation is complete.

7. In the Finish Page, click the Finish Button. If "Launch QNE Business Solutions" is checked, it will launch QNE Optimum automatically.

Client Workstations Connection to QNE Server
1. Open QNE Business Solution and Click 'Database Wizard' icon

2. Click 'Append' Button to add existing database(s) into the Application

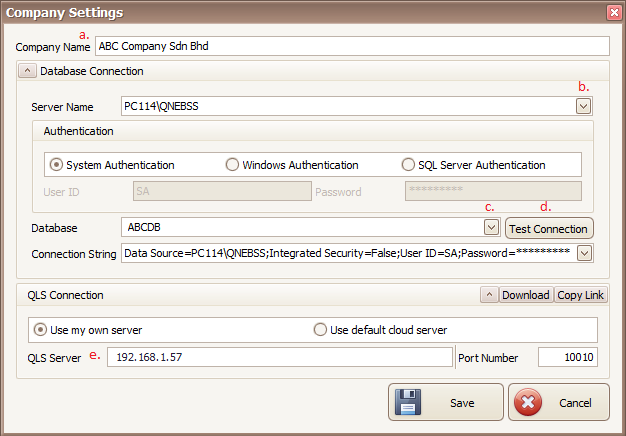
3. On the following screen :-
a. Key in the Company Name
b. Select the Server Name ( Server/PC name where the database file is located)
c. Select the Database you want to add.
d. Click 'Test Connection' button.

If success, Click OK and Save the settings.

e. On the QLS Server box, key in either the Server Name or Server IP Address
Note : For Database Hosting, select "Use Default Cloud Server"

Was this article helpful?
That’s Great!
Thank you for your feedback
Sorry! We couldn't be helpful
Thank you for your feedback
Feedback sent
We appreciate your effort and will try to fix the article